The eSales Delta platform is taking security to the next level and introducing multi-factor authentication.
You may already be familiar with multi-factor authentication (MFA) as it is commonly practised by various online service portals, such as online banking. It is essentially a process that requires the user to enter more than one piece of information to access their account. For example, in addition to entering a password you may also be asked to enter a code that has been sent to your mobile device or email account.
In the case of eSales, our MFA process will involve users logging in with their current user name and password and carrying out the second authentication step using either Google or Microsoft’s multi-factor authentication app. Rest assured that this is very easy to do and both Google and Microsoft provide helpful setup and user guides.
Please be advised that it will be your organisation’s responsibility to ensure that your users have downloaded and set up the Google or Microsoft authenticator application on either their work or personal mobile devices.
In the first instance, implementing MFA is good practice and, as mentioned, very commonplace, but the main reason for adding MFA to the eSales Delta platform is security and to ensure that eSales continues to be compliant in line with current guidance from the National Cyber Security Centre. For more information and advice from the NCSC on implementing MFA, please visit NCSC Guidance for Multi-Factor Authentication.
This will cause very little disruption for our users after the app is installed on your mobile device. As we are implementing an additional step using the authenticator app, all eSales users will need to download either the Google or Microsoft authenticator apps to their devices. These can be downloaded for free from most app stores such as Apple or Google Play store – the links below are for information, you should install your preferred authenticator on the mobile device you intend to use for authenticating your login to the eSales platform.
Google Authenticator
Google Authenticator for Apple IOS iPhones and iPads
Google Authenticator for Android Phones and Tablets
Microsoft Authenticator
MS Authenticator for Apple IOS iPhones and iPads
MS Authenticator for Google Android Phones and Tablets
Multi-factor authentication will be launched on 12th April.
In the meantime, if the eSales platform is used within your organisation, we advise that you communicate this among all of the eSales users within your team and we would also advise that you inform your IT departments of the introduction of MFA.
Further information will added to this page in due course and will be emailed to all eSales users, but if you have any questions please feel free to contact the helpdesk team at helpdesk@delta-esourcing.com.
Below is a step-by-step guide on what to expect when you log in to eSales after MFA has gone live. In preparation for this, we recommend you download either Google or Microsoft’s authenticator app on your device as this will save time later on.
Step 1:
When you first visit the eSales login, the screen will ask for your details as before – enter your usual username and password.
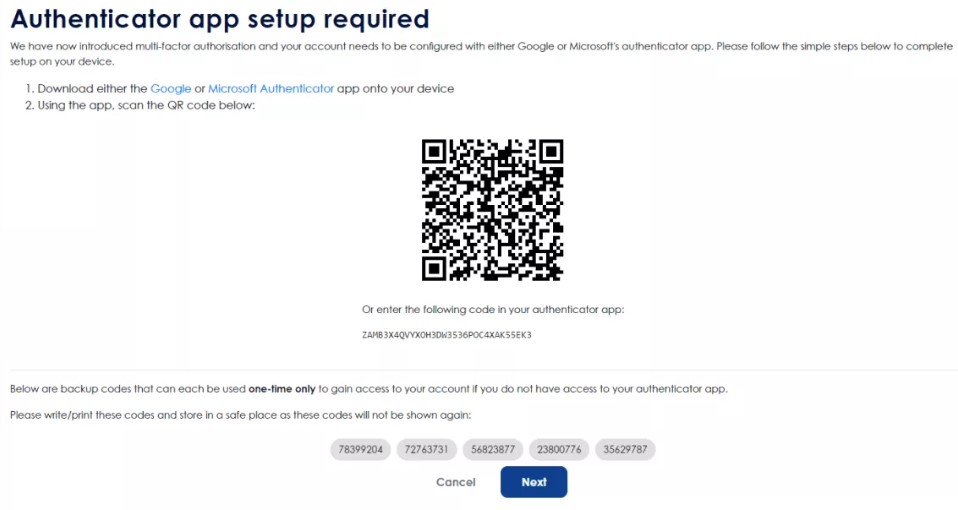
Step 2:Next you will need to set up the authenticator app. Please note that you will need to download either the Google or Microsoft authenticator app on to your device in advance.
Scan the QR code on the screen using the authenticator app and you will be shown a token code for the next step.
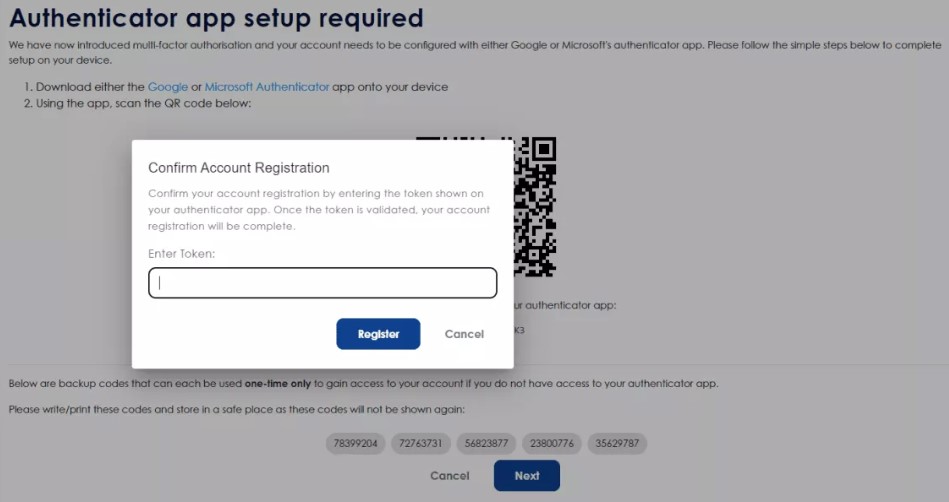
Step 3:Enter the token code from your authenticator app and then click ‘Register’.
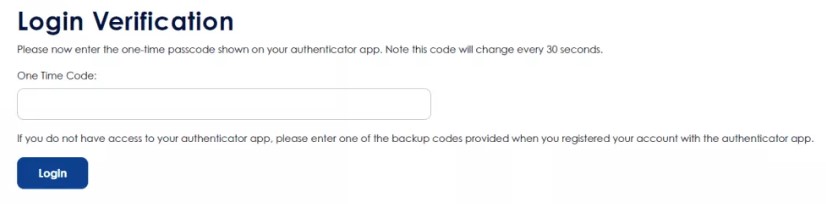
Step 4:Next you will be shown a one-time passcode on your authenticator app. Please enter that into the box shown on screen and click ‘Login’.
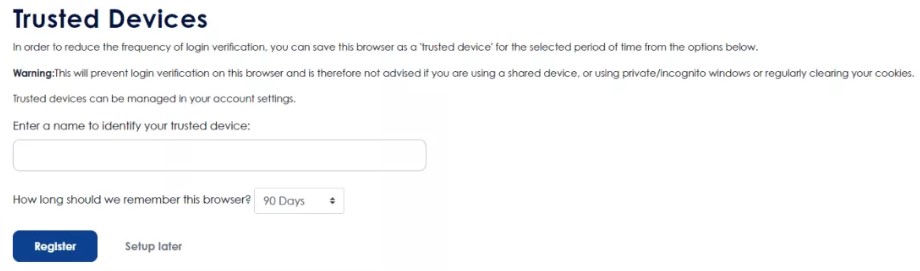
Step 5:In order to reduce the frequency of login verification, you can opt to trust the browser that you are logging in from. If you choose to set this up, simply name the device and choose how long you would like to remember the browser. The options are 30, 60 or 90 days. Then click ‘Register’. You can also choose to skip this step and set up at a later date.
Step 6:You will now be logged in to the eSales platform and can continue to use it as needed. The next time you log in to eSales you will use your username and password as before but will then be asked to enter a one-time passcode from the authenticator app. This is MFA. Simply open your authenticator app and enter the passcode shown. Please note that the passcode refreshes every 30 seconds.
We are aware that many eSales users have shared accounts? for example, multiple users using the same username and password to access the eSales platform.
There are two options:
Option 1:
One member of your team sets up the authenticator originally and then provides the token to each user who can then log in with the shared login. Each user then selects to trust their device for 90 days, which allows them to log in without the token for 90 days. However, they will need to get a token every 90 days.
Option 2:
Each team member is invited to the organisation using their own email address and then has their own login username and password, allowing them to set up their individual authenticator meaning they wouldn’t be sharing. Each user would then need to ask the asset owner for all the tenders they work on to add them to the email alert preferences so they continue to get system emails for those tenders. There is no limit to how many eSales user accounts you can have within your organisation.
We would recommend option 2 as this means that each individual eSales user within your team has their own logins and is responsible for their own authenticator app access codes. You can do this easily by inviting individual users to your organisation via Account Settings.
To do this, simply login to the shared eSales account and follow the steps below:
- Click on ‘Settings’ in the left side menu
- Click on ‘Company Settings’ in the left side menu
- Click on ‘Users’ in the left side menu
- Click on ‘Invite New Users’ button
- Click on ‘Add E-mail’ button
- Enter the team member’s email address
- Enter their role
- Select which Organisation Group the invited user to be assigned to
- Click on the ‘Add E-mail’ button – continue to ‘Add E-mail’ for all individuals you would like to be invited
- Once all email addresses have been added, click on the ‘Next’ button
- Click on the ‘Invite’ button
Invited users will receive an email from the eSales platform informing them that they have been invited to eSales on behalf of the organisation and will receive instructions on how to complete their registration.
Please note, if your organisation uses a shared mailbox to receive eSales email, each new user would need to edit their email preferences so that any eSales communications and alerts go to the shared inbox instead of the individual’s email inbox.
For any help or advice regarding shared accounts, please contact our Helpdesk team at helpdesk@delta-esourcing.com.